Please excuse the super quick post from me today - my youngest is poorly! I'm scheduling this Tuesday evening while he naps, I think it may be a long night.
Anyways, while he rests, I've made a card using Whimsical Going Somewhere Girl AlishBA from The Octopode Factory. I love Lily's images and we are delighted to be sponsored by her this week at Crafting By Designs - why not show us your birthday creations to be in with a chance of winning some gorgeous Octopodes of your own.
I have used a Halloween paper pad, Oct 31 by Fancy Pants Designs to create this card. It's layered up with black pearlescent paper on a black 6x6" card base. I've coloured the image as always with Promarkers and matched the papers to the turquoise and purple colours of the image. The sentiment is Craftwork Cards as is the purple Candi corners. I've finished with a black seam binding bow, rolled roses and black pins.
Thanks for looking, I hope you'll join us this week at Crafting by Designs.
Mo xxx
Showing posts with label Birthday. Show all posts
Wednesday, 8 January 2014
Friday, 1 November 2013
Favourite Colour Challenge at Just For Fun....
You know what that means.. PURPLE!!!
Yeah, my favourite colour is purple and I have made a birthday card for the Just For Fun Challenge Blog using some stunning papers from the Craftwork Cards Time Flies Collection. This is a large 8x8" card and I have actually given it to my friend for her 50th birthday.
The front of the card was covered with a book print type paper which was spritzed with Tattered Angels Glimmer Mist in Fully Purple. Another of the papers was torn and used in the two corners and all the edges inked with Dusty Concord Distress Ink from Tim Holtz at Ranger.
I used a spellbinders Fluer de Lis square to cut a mat of the cog patterned paper for the die cut and layered butterfly to sit upon. Again this was inked with dusty concord. I added one of the die cut sentiments, a purple bow and some paper flowers. The corners also have a purple pearlescent flourish cut using a die-namics die.
The front was finished with some Purple Stickles around the sentiment and butterfly wings and Star Dust Stickles on the flowers and butterfly body.
I also added some torn paper, a sentiment and die cut label to the inside... .along with yet more dusty concord!
I hope you will join us and show us your favourite colour creations at Just For Fun this month!
thanks for looking!
Mo xxx
Yeah, my favourite colour is purple and I have made a birthday card for the Just For Fun Challenge Blog using some stunning papers from the Craftwork Cards Time Flies Collection. This is a large 8x8" card and I have actually given it to my friend for her 50th birthday.
The front of the card was covered with a book print type paper which was spritzed with Tattered Angels Glimmer Mist in Fully Purple. Another of the papers was torn and used in the two corners and all the edges inked with Dusty Concord Distress Ink from Tim Holtz at Ranger.
I used a spellbinders Fluer de Lis square to cut a mat of the cog patterned paper for the die cut and layered butterfly to sit upon. Again this was inked with dusty concord. I added one of the die cut sentiments, a purple bow and some paper flowers. The corners also have a purple pearlescent flourish cut using a die-namics die.
The front was finished with some Purple Stickles around the sentiment and butterfly wings and Star Dust Stickles on the flowers and butterfly body.
I also added some torn paper, a sentiment and die cut label to the inside... .along with yet more dusty concord!
I hope you will join us and show us your favourite colour creations at Just For Fun this month!
thanks for looking!
Mo xxx
Anything Goes at Craft Mojo Challenge Blog this month!
Hope you all had a great Halloween!! November time now and getting so close to Christmas! Anyway, before all that, it's time for a new challenge at Craft Mojo. This month the theme is Anything Goes!
I have gone for something a bit different for me this month and created a black and silver card with lots of layering, corrugated stars and a blingy bow. I also dug out the Cricut and cut the name and number using the Cricut Craft Room software and craftroom basics files.
Everything was layered up on the 8x8" card base and hot glue used to attach the diamantes to the bow.
This was made for a friend to give another friend on her birthday recently, hope they both liked the card!
Thanks for looking, hope you will join us for Anything Goes this month at Craft Mojo!
Mo xxx
I have gone for something a bit different for me this month and created a black and silver card with lots of layering, corrugated stars and a blingy bow. I also dug out the Cricut and cut the name and number using the Cricut Craft Room software and craftroom basics files.
Everything was layered up on the 8x8" card base and hot glue used to attach the diamantes to the bow.
This was made for a friend to give another friend on her birthday recently, hope they both liked the card!
Thanks for looking, hope you will join us for Anything Goes this month at Craft Mojo!
Mo xxx
Wednesday, 30 October 2013
Birthday Celebrations at the Crafters Cafe Challenge Blog
Ok, so maybe Halloween isn't for you, well today we have a Birthday challenge at the Crafters Cafe Challenge Blog and this might be more your thing! We are sponsored by Eureka Stamps and I have been working with a pile of presents to show you today!
I have coloured the image with promarkers and added stickles in various matching colours and teamed the image with the new Craftwork Cards Vintage Boho paper and die cuts kit. I used a spellbinders die to cut a mat for the image and inked the edges with Peacock Feathers distress ink, mounted this onto a couple of doilies also with the DI on the edges.
I decided to make this an easel card just to be a bit different from my usual 6x6 sqaure! I covered the card base with papers from tehe Vintage Boho pad and layered up a sentiment to hold the easel in place.
I finished the card with more Peacock Feathers DI and Lagoon Stickles along with a couple of frilly flowers cut from strips of the paper.
Thanks for looking, hope you enjoyed the card and I hope to see you for some birthday celebrations at the Crafters Cafe!
Mo xxx
I have coloured the image with promarkers and added stickles in various matching colours and teamed the image with the new Craftwork Cards Vintage Boho paper and die cuts kit. I used a spellbinders die to cut a mat for the image and inked the edges with Peacock Feathers distress ink, mounted this onto a couple of doilies also with the DI on the edges.
I decided to make this an easel card just to be a bit different from my usual 6x6 sqaure! I covered the card base with papers from tehe Vintage Boho pad and layered up a sentiment to hold the easel in place.
I finished the card with more Peacock Feathers DI and Lagoon Stickles along with a couple of frilly flowers cut from strips of the paper.
Thanks for looking, hope you enjoyed the card and I hope to see you for some birthday celebrations at the Crafters Cafe!
Mo xxx
Wednesday, 2 October 2013
Anything Goes with Sassy Design Studio at Crafting By Designs
Hi folks! We have another round of 'Anything Goes' this week at Crafting by Designs and we have fabulous sponsorship in the shape of Sassy Studio Designs. This means that I got to play with one of my favourite Sassy's - Princess Leia! My hubby and son are walking encyclopedias when it comes to all things Star Wars and my 3 year old is following suit although he much prefers the Angry Bird Star Wars to the real thing!
Anyway, I showed hubby the image and he informed me that she her dress is White, her tights are white and her boots ..... are white! So I got out my Cool Grey 1 and a blender pen and added some shadows to the white paper! The image is coloured with Promarkers and the papers are from a monochrome pad I bought in The Works in a bargain bin.
I have followed a Sketch from 'Sketch N Stash' and will be entering the card into the current challenge there.
I will also be entering her into the following challenges -
ABC Challenges - 3 or more patterned papers
Stamp and Create - Birthdays
Tammy's Scrapin Corner - Monochromatic
Thanks for looking!
Mo xxx
Anyway, I showed hubby the image and he informed me that she her dress is White, her tights are white and her boots ..... are white! So I got out my Cool Grey 1 and a blender pen and added some shadows to the white paper! The image is coloured with Promarkers and the papers are from a monochrome pad I bought in The Works in a bargain bin.
I have followed a Sketch from 'Sketch N Stash' and will be entering the card into the current challenge there.
I will also be entering her into the following challenges -
ABC Challenges - 3 or more patterned papers
Stamp and Create - Birthdays
Tammy's Scrapin Corner - Monochromatic
Thanks for looking!
Mo xxx
Wednesday, 25 September 2013
Anything Goes at Crafting by Designs - A New Challenge
Hi everyone, time for a new 'Anything Goes' challenge over at Crafting By Designs and this week we are sponsored by Meljen's Designs Digital Stamps. I have had the joy of working with the image Victorian Goth Girl and have gone with a purple and black steampunk inspired card.
The image as always is coloured using my Promarkers and I've layered it up with purple pearlescent paper. I have used a Tri-boss Cogs embossing folder for the light brown paper behind it and an Embossabilities brick embossing folder for the background - both have Dusty Concord distress ink rubbed onto highlight the embossing. The die-cut cogs are using a set of X-Cut dies through my Cuttlebug with the same black and purple pearlescent papers. The sentiment is Craftwork Cards.
I will enter this card into the following challenge -
My Craft Creations - Anything Goes
LEJ Designs - Lots of Layers
Party Time Tuesdays - Anything Goes
613 Avenue Create - Anything Goes
Through the Craft Room Door - Anything Goes
The Paper Make Up Stamps Blog - #107 Anything Goes
Tammy's Scrappin Corner - Happy Birthday
Thanks for looking!
Mo xxx
The image as always is coloured using my Promarkers and I've layered it up with purple pearlescent paper. I have used a Tri-boss Cogs embossing folder for the light brown paper behind it and an Embossabilities brick embossing folder for the background - both have Dusty Concord distress ink rubbed onto highlight the embossing. The die-cut cogs are using a set of X-Cut dies through my Cuttlebug with the same black and purple pearlescent papers. The sentiment is Craftwork Cards.
I will enter this card into the following challenge -
My Craft Creations - Anything Goes
LEJ Designs - Lots of Layers
Party Time Tuesdays - Anything Goes
613 Avenue Create - Anything Goes
Through the Craft Room Door - Anything Goes
The Paper Make Up Stamps Blog - #107 Anything Goes
Tammy's Scrappin Corner - Happy Birthday
Thanks for looking!
Mo xxx
Wednesday, 11 September 2013
Time for a challenge!!
I really hope it's nice and sunny wherever you are reading this right now! As I type (Tuesday afternoon) the sun is shining, I've just gotten in from a four mile walk with the baby and I will shortly hang a washing out to dry in the breeze, a lovely late summer, early autumn day. Now, if you are reading this you will be wondering what the challenge is... Well, I have a new one for you today! I have been asked to join the Crafting By Designs Challenge Blog Design Team! A big Thank You to Doris for accepting me onto the team I hope I can do you proud!
Crafting by Designs is a weekly challenge blog and the new one starts today - Anything Goes. This week we are sponsored by Kenny K and I have the privelege of working with his Happy Hour digi stamp. I have teamed it up with some Craftwork Cards paper, sentiments, flowers and butterflies as well as one of their new 'quilted' Polaroid frames. I coloured the frame using Dusty Concord Distress Ink and added platinum Liquid Pearls as an accent. The image has been coloured with promarkers - not my best colouring but I do love the bold black and purple dress - I want one!
I will enter this card into the following challenges -
Card Mania - Favourite Colour Combination (Black, White & Purple)
613 Avenue Create - Anything Goes
Challenges 4 Everybody - Anything Goes
Totally Gorjuss - Anything Goes
Thanks for looking!
Mo xxx
Crafting by Designs is a weekly challenge blog and the new one starts today - Anything Goes. This week we are sponsored by Kenny K and I have the privelege of working with his Happy Hour digi stamp. I have teamed it up with some Craftwork Cards paper, sentiments, flowers and butterflies as well as one of their new 'quilted' Polaroid frames. I coloured the frame using Dusty Concord Distress Ink and added platinum Liquid Pearls as an accent. The image has been coloured with promarkers - not my best colouring but I do love the bold black and purple dress - I want one!
I will enter this card into the following challenges -
Card Mania - Favourite Colour Combination (Black, White & Purple)
613 Avenue Create - Anything Goes
Challenges 4 Everybody - Anything Goes
Totally Gorjuss - Anything Goes
Thanks for looking!
Mo xxx
Thursday, 25 July 2013
My Spidey Sense is tingling!
Yes, Its a second blog post from me today, but I just had to get these two cards made and posted in time for their challenges! I have had these two cards on my 'to do' list literally for weeks - they are monthly challenges, so have been on the list nearly a month!!!
Without further a do, here is the first! Challenge #6 over at the Movie Magic Monthly blog is all about Marvel and the brief being to make a project with a Marvel Action Hero on it. We are all big Marvel fans in this house - hard not to be with 3 boys - so I knew right away I would make a card for my youngest who wil be 2 in a few months. I have used an image from the back of my other young son's Spiderman colouring book and a Sizzix Halloween embossing folder for the web - I coloured the inside of the folder with a blue dye ink pad before running it through the cuttlebug for the effect shown. I finished the card with his name on some red card candi, a number 2 die cut and some birthday ribbon.
This card will be entered into the following challenges -
Movie Magic Monthly - Marvel Action Hero
My Craft Creations - Die Cut Shapes (number)
Here Come the Boys - Anything Goes for man/boy
My second card here is for the Cards Galore Challenge for July entitled 'Copy That'. I have been inspired by Isobel Hunter's card and used the same layout but have used a Craftwork Cards chandelier stamp and sentiment. I have added two black seam binding bows instead of a flower and white bow.
I will enter this card into the following challenges -
Cards Galore Challenge - Copy That
Seize the Birthday - Anything Goes Birthday Celebration
Thanks for looking!
Mo xxx
Without further a do, here is the first! Challenge #6 over at the Movie Magic Monthly blog is all about Marvel and the brief being to make a project with a Marvel Action Hero on it. We are all big Marvel fans in this house - hard not to be with 3 boys - so I knew right away I would make a card for my youngest who wil be 2 in a few months. I have used an image from the back of my other young son's Spiderman colouring book and a Sizzix Halloween embossing folder for the web - I coloured the inside of the folder with a blue dye ink pad before running it through the cuttlebug for the effect shown. I finished the card with his name on some red card candi, a number 2 die cut and some birthday ribbon.
This card will be entered into the following challenges -
Movie Magic Monthly - Marvel Action Hero
My Craft Creations - Die Cut Shapes (number)
Here Come the Boys - Anything Goes for man/boy
My second card here is for the Cards Galore Challenge for July entitled 'Copy That'. I have been inspired by Isobel Hunter's card and used the same layout but have used a Craftwork Cards chandelier stamp and sentiment. I have added two black seam binding bows instead of a flower and white bow.
I will enter this card into the following challenges -
Cards Galore Challenge - Copy That
Seize the Birthday - Anything Goes Birthday Celebration
Thanks for looking!
Mo xxx
Wednesday, 3 July 2013
My Gran is 90!!!
Am a week or so late with this post but wanted my gran to get her card and gift before posting about it.
She lives in California and has just turned 90 this last week and looks fab for it! Here she is with my 3 aunts: Deirdre on the left (who no doubt will be the first to see this blog post!!!), my Gran, Caroline and Moira.
Here is the card that I made - its an 8x8" square card covered with Tea Dance kit papers from Craftwork Cards. I've usedsome of the die cut flowers from the kit and made more using the Tim Holtz tattered florals die and layered them to embellish the card. I've also used a tag from the kit with Vintage Photo distress ink.
I've added a doily behind the tag and used ZVA Creations self adhesive pearls as well as pearl beads on a string around the edges. I've added wide white lace too.
Platinum stickles and liquid pearls are my favourite finishing touches at the moment and have been added to the edges and the flowers.
Some more of the papers have been used to embellish the inside and the envelope!
I'm so glad she liked this.
I'm entering this into the My Craft Creations Challenge - Special Occasions.
Mo xxx
She lives in California and has just turned 90 this last week and looks fab for it! Here she is with my 3 aunts: Deirdre on the left (who no doubt will be the first to see this blog post!!!), my Gran, Caroline and Moira.
Here is the card that I made - its an 8x8" square card covered with Tea Dance kit papers from Craftwork Cards. I've usedsome of the die cut flowers from the kit and made more using the Tim Holtz tattered florals die and layered them to embellish the card. I've also used a tag from the kit with Vintage Photo distress ink.
I've added a doily behind the tag and used ZVA Creations self adhesive pearls as well as pearl beads on a string around the edges. I've added wide white lace too.
Platinum stickles and liquid pearls are my favourite finishing touches at the moment and have been added to the edges and the flowers.
Some more of the papers have been used to embellish the inside and the envelope!
I'm so glad she liked this.
I'm entering this into the My Craft Creations Challenge - Special Occasions.
Mo xxx
Saturday, 15 June 2013
Tsunami Rose Butterflies!
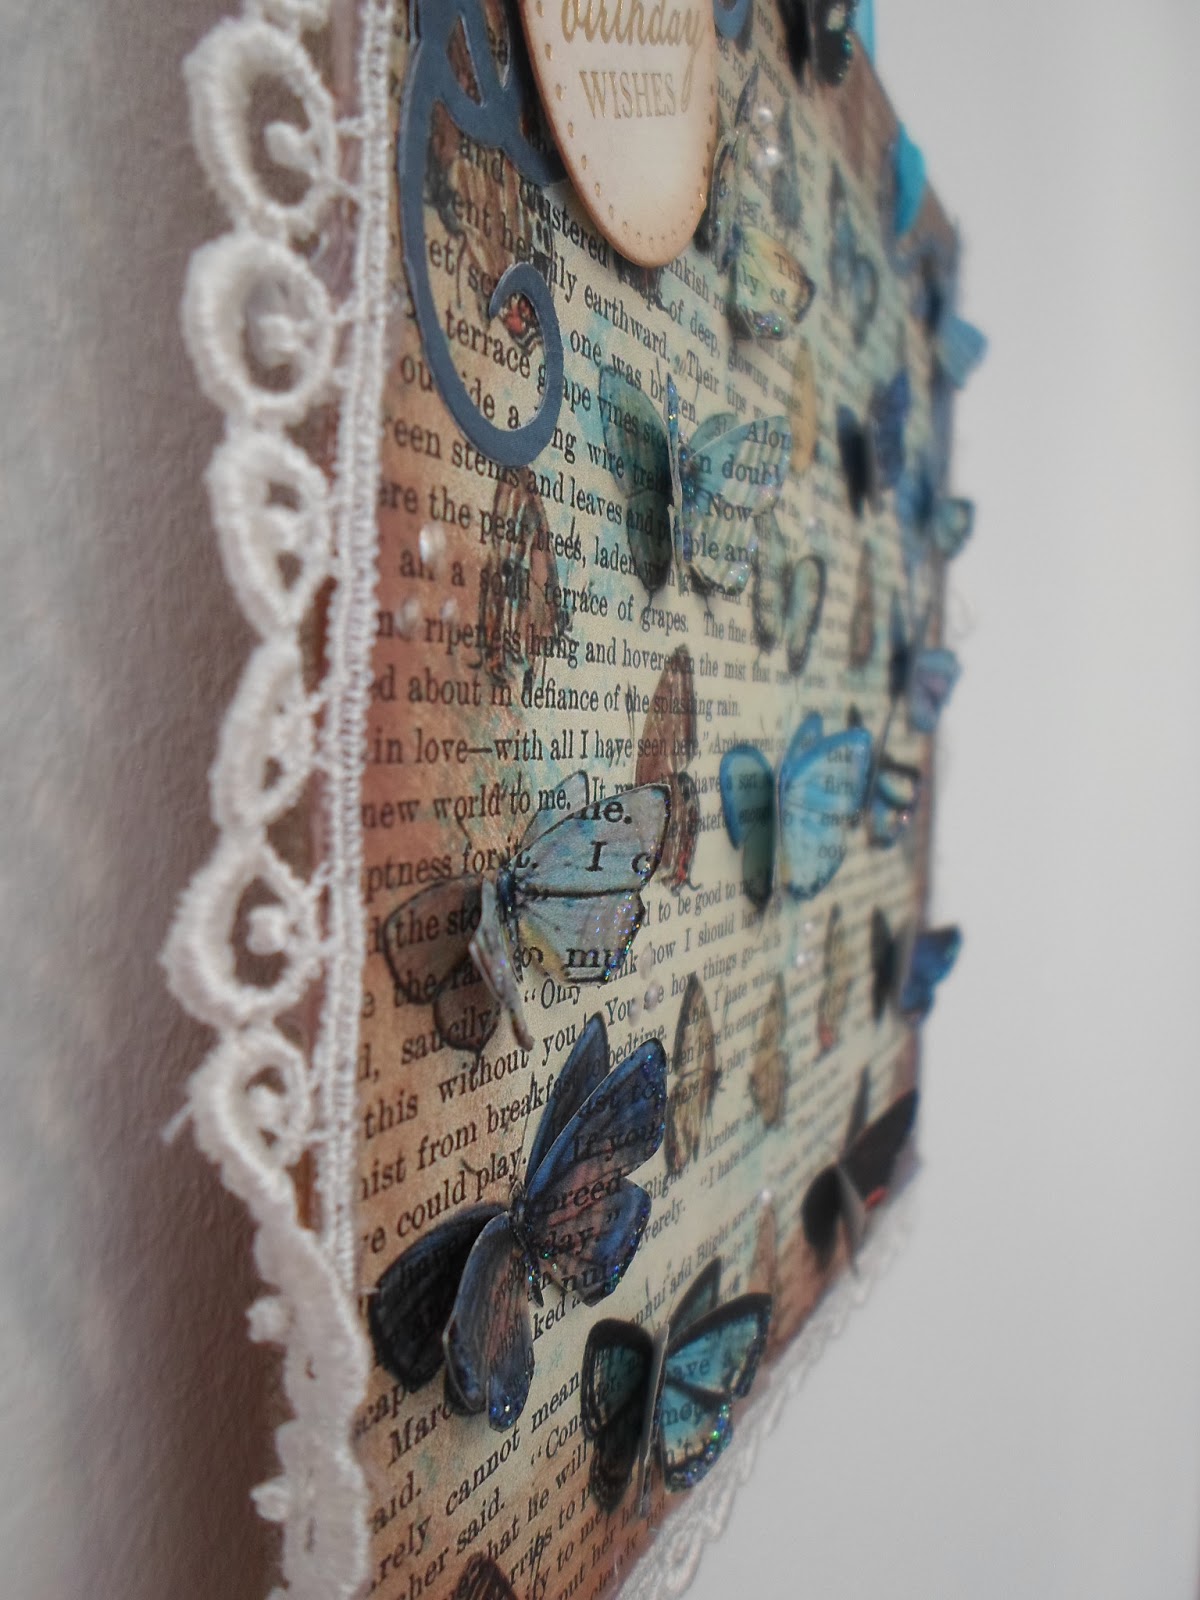
Today I'm here with a gorgeous 6x6" book page printed with vintage butterflies from Tsunami Rose Designs. Its such a gorgeous paper I dont think it needs much else! Tsunami Rose papers are printable files that you buy to print in your home as often as needed - so I printed it twice and inked around the edges of the first sheet with Vintage Photo distress ink.
With the second sheet, I fussy cut many of the full butterflies and used cosmic shimmer glue to the bodies, allowing the wings to fly off the page, giving a 3D effect. I added corner flourishes and a sentiment. Lace around three edges finishes this wall hanging with matching blue organza.
Here are the links for all your Tsunami Rose Design needs -
Tsunami Rose Blog: http://tsunamirosedesigns.blogspot.com/
Tsunami Rose Zibbet shop: http://www.zibbet.com/tsunamirose
Tsunami Rose Etsy Shop: http://www.etsy.com/shop/TsunamiRose
Tsunami Rose Facebook Page: http://www.facebook.com/tsunamirosegraphicdesign
Tsunami Rose Facebook Group: http://www.facebook.com/groups/tsunamirosedesigns/
thanks for looking!
Mo xxx
Friday, 14 June 2013
Happy Birthday Carly!
I took a stall at my kids primary school Christmas Fayre last December and a young girl, upon seeing my Gorjuss Girls Christmas cards showed such excitement that I gave one for however many pennies she had left in her pocket - not many!
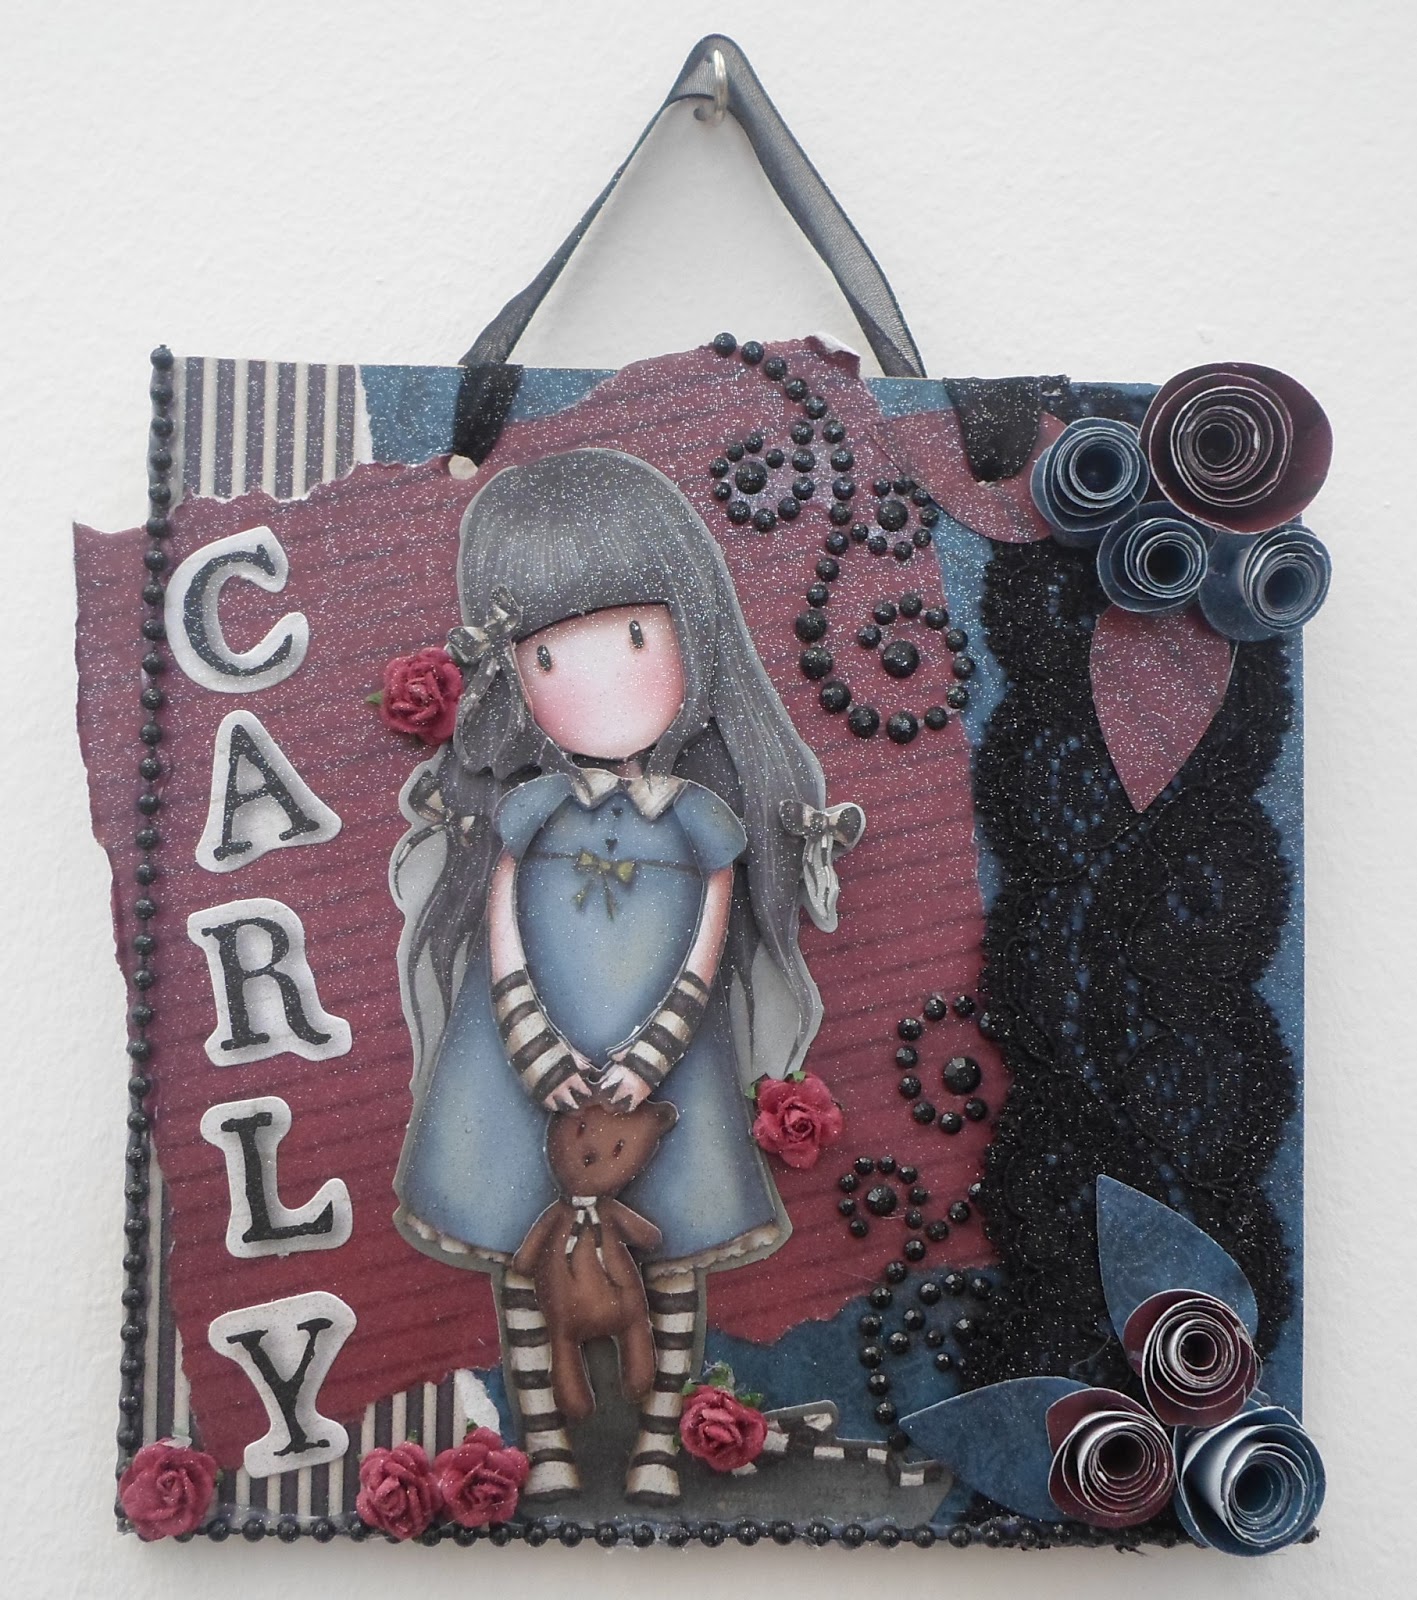
So, roll on last week. My son comes home from school with a birthday invite for this very same girl! I knew right away that I would have to do something Gorjuss for her and so here it is. If you've been here recently you'll already know that not only do I love my Gorjuss, I am also loving wall hangings just now so i've combined the two for Carly.
This is her card. For all the items I've used the DoCrafts Gorjuss range of papers, die cuts, ribbons and washi tape. Here I've just done some simple matting and layering, using two images, and have added black lace, mulberry paper roses and rolled black roses.
I added some washi tape to the inside of the card and to the envelope as well.
My wall hanging is 6x6" and uses the same papers, rolled roses, lace and i've added beading and bling. I used the Gorjuss stickers to spell out Carly and have sprayed the whole thing with Silver Spray and Sparkle.
So, roll on last week. My son comes home from school with a birthday invite for this very same girl! I knew right away that I would have to do something Gorjuss for her and so here it is. If you've been here recently you'll already know that not only do I love my Gorjuss, I am also loving wall hangings just now so i've combined the two for Carly.
This is her card. For all the items I've used the DoCrafts Gorjuss range of papers, die cuts, ribbons and washi tape. Here I've just done some simple matting and layering, using two images, and have added black lace, mulberry paper roses and rolled black roses.
I added some washi tape to the inside of the card and to the envelope as well.
My wall hanging is 6x6" and uses the same papers, rolled roses, lace and i've added beading and bling. I used the Gorjuss stickers to spell out Carly and have sprayed the whole thing with Silver Spray and Sparkle.
And finally, I made a tag to match for the gift bag.
I hope Carly has a lovely party tonight and can find room on her almost teenage girl bedroom wall to display her wall hanging.
Mo xxx
Sunday, 2 June 2013
Tea Dance Candles and a Card
Just a quick post from me this gloriously sunny evening!
It was my aunt's birthday a few days ago and she too is a cardmaker so I figured something crafty would be a great present for her and maybe get pride of place in her craft room!
For both the card and the present i've used the new Tea Dance collection from Craftwork Cards. The kit includes papers, sentiments, bunting, flowers and banners/borders and free mannequins! I love it and i'm sure you'll be seeing more from me using this kit!
For the card, i've covered the base in the polka dot paper and fussy cut a doily from another sheet and adhered using 3D foam. The doily has this gorgeous flower image in there which I've added some star dust Stickles and White Opal Liquid Pearls. A sentiment and some of my fabby poundland bling finish the card!
For her gift, I have decorated some pillar candles using the kit. I wrapped some paper around the candle and added ribbon and beading to them with the hot glue gun. I then cut some flowers using my Tim Holtz tattered floral die and layered them with some of the die cut flowers from the kit for both candles. The large flower being the main embellishment for the first candle and a decorated mannquin with flowers on the second one.
The wraps will come off if need be and can be put on another candle, but i'm assured these will go in my aunt's craft room to be admired!
Hope you like them too! thanks for popping in,
Mo xxx
It was my aunt's birthday a few days ago and she too is a cardmaker so I figured something crafty would be a great present for her and maybe get pride of place in her craft room!
For both the card and the present i've used the new Tea Dance collection from Craftwork Cards. The kit includes papers, sentiments, bunting, flowers and banners/borders and free mannequins! I love it and i'm sure you'll be seeing more from me using this kit!
For the card, i've covered the base in the polka dot paper and fussy cut a doily from another sheet and adhered using 3D foam. The doily has this gorgeous flower image in there which I've added some star dust Stickles and White Opal Liquid Pearls. A sentiment and some of my fabby poundland bling finish the card!
For her gift, I have decorated some pillar candles using the kit. I wrapped some paper around the candle and added ribbon and beading to them with the hot glue gun. I then cut some flowers using my Tim Holtz tattered floral die and layered them with some of the die cut flowers from the kit for both candles. The large flower being the main embellishment for the first candle and a decorated mannquin with flowers on the second one.
The wraps will come off if need be and can be put on another candle, but i'm assured these will go in my aunt's craft room to be admired!
Hope you like them too! thanks for popping in,
Mo xxx
Wednesday, 15 May 2013
Tsunami Rose Designs Challenge #20 Tags, Tags, Tags!
It's Wednesday again!!! Here's my DT post for Tsunami Rose Designs.
This week's challenge is themed 'Tags, Tags, Tags!' and we are using Sampler sheets of Tsunami Rose Printable Ephemera which you can get for only $2 or as a free gift with your purchases this month from the TRD zibbet shop - all the links you need are at the bottom of this post - come and have a look at her beautiful papers, journal kits, sentiments and ephemera -stunning designs!!
Well, here is my project - I've gone with a card again... I think i've only ever done one tag on its own as a stand alone tag - this is something i might work on the next few months, making tag art.... I do have a Pinterest board with lots of tags and I know there's loads of inspiration out there. Anyway, i made a tag and popped it onto the front of a birthday card - and I even put another tag on the inside too!
I have used images from Tsunami Rose Designs along with a sentiment too - these can all be found on the ephemera samplers found in the shop on the links below. I have used some vintage seam binding on the tag and a white doily in behind it for another layer. Some lace and beading along the bottom of the tag for texture.
The background paper and paper flowers on the card are from Ephemera's Vintage Garden - these are printable papers found on the blog and they have a shop for even more beautiful printables.
The tag on the inside is using a sentiment from the same sampler pack and paper from the Tsunami Rose Damask Madame 6x6 paper pack and more sema binding.
Sorry for the quick post from me, some of the kids are still icky! Normal service should resume soon! I hope!
Mo xxx
Sunday, 31 March 2013
Happy Easter and Happy 3rd Birthday to Callum!
Happy Easter to everyone! Hope you all have a lovely day with your families and friends and eat lots of chocolate eggs!
Today is a double celebration in our house as it's our third child's 3rd Birthday! Wee Calpal as he's affectionately known has opened loads of pressies and cards and we have more family coming in the afternoon for roast beef and all the trimmings! He is a huge Star Wars fan but every supermarket in the vicinity has been sold out of Star Wars cakes all week so he admitted defeat and chose a football themed cake - black and white with football boots on!
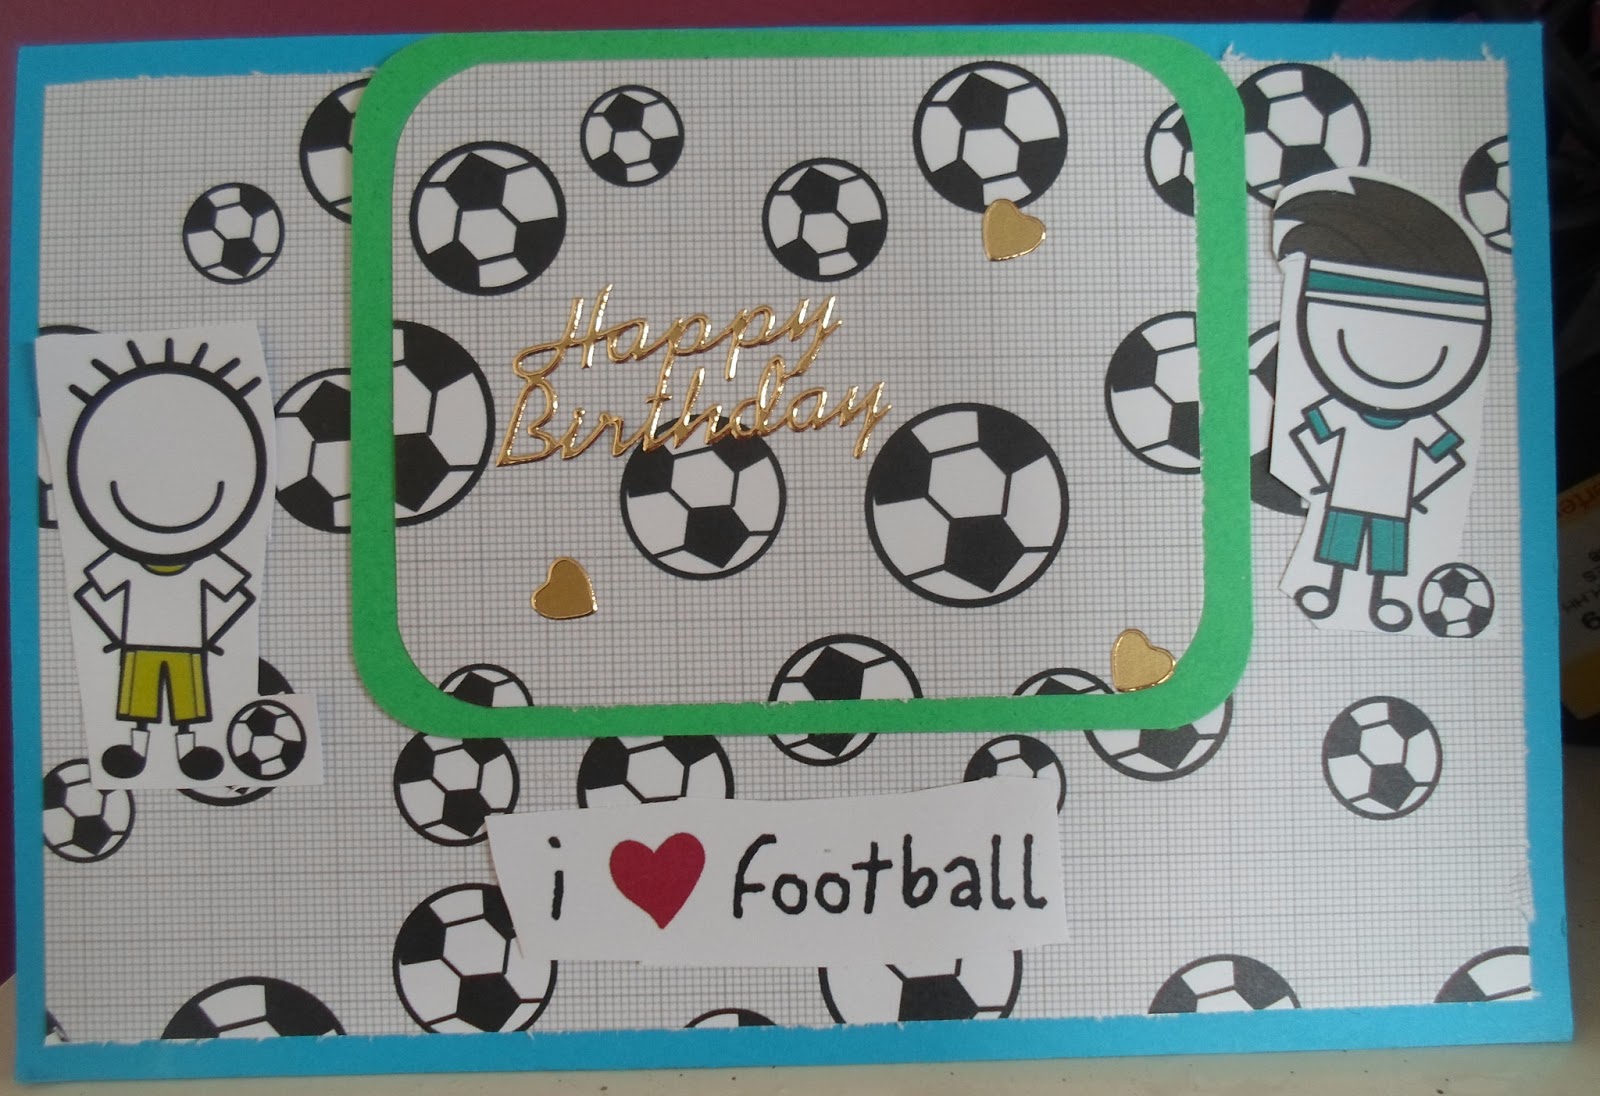
The cake is quite fitting given that my crafty daughter has made Callum a birthday card - with a football theme! She picked some boys Smirk papers from my stash and some matching coloured card, some matting and layering - with help from myself - and some gold peel offs to finish the card and he loved it!
For my card for Callum, i've used the Kaiser Crafts Technologic 6.5" paper pack with a chipboard 3D robot embellishment from the same line. Some matting and layering onto a 6x6 Kraft Card blank and one of the pop out borders along the bottom.
One of the papers is a repeat pattern using keyboard keys, so i've cut out the letter for his name and adhered these with 3d foam onto a die cut tag also from the paper pack.
A silver '3' and some kraft Card Candi finish the card and he loved it!
Enjoy your weekend and the holidays if you have time off.... or your kids have!
Be back soon with my first DT project for Tsunami Rose Designs and this week's challenge entry - #13 Altered Journal!
Mo xxx
Today is a double celebration in our house as it's our third child's 3rd Birthday! Wee Calpal as he's affectionately known has opened loads of pressies and cards and we have more family coming in the afternoon for roast beef and all the trimmings! He is a huge Star Wars fan but every supermarket in the vicinity has been sold out of Star Wars cakes all week so he admitted defeat and chose a football themed cake - black and white with football boots on!
The cake is quite fitting given that my crafty daughter has made Callum a birthday card - with a football theme! She picked some boys Smirk papers from my stash and some matching coloured card, some matting and layering - with help from myself - and some gold peel offs to finish the card and he loved it!
For my card for Callum, i've used the Kaiser Crafts Technologic 6.5" paper pack with a chipboard 3D robot embellishment from the same line. Some matting and layering onto a 6x6 Kraft Card blank and one of the pop out borders along the bottom.
One of the papers is a repeat pattern using keyboard keys, so i've cut out the letter for his name and adhered these with 3d foam onto a die cut tag also from the paper pack.
A silver '3' and some kraft Card Candi finish the card and he loved it!
Enjoy your weekend and the holidays if you have time off.... or your kids have!
Be back soon with my first DT project for Tsunami Rose Designs and this week's challenge entry - #13 Altered Journal!
Mo xxx
Sunday, 24 March 2013
"Wishing you the happiest of days..."
Today i've created a 6x6 card using Tsunami Rose Vintage Rouge papers in both the Black and the Black and Pink.
I covered a white base card with burgandy paper and then adhered a slightly smaller size of the Vintage Rouge Black to the card with some dusky pink lace ribbon down the left edge. I covered different sized tags with the two variations of the paper, added burgandy grosgrain ribbon and gold stickles around the edges.
I found a sentiment stamp for the top right corner and used my Versamark to stamp this, adding gold embossing powder. Using a glue pen, I ran glue around the edges of the card and added more gold embossing powder. My trusty heat tool was dug out of storage for this - I haven't used a heat embossing technique for quite some time! I'm just glad it still worked!
This vintage image is also from Tsunami Rose Designs and I added more gold stickles around to make a frame for the vintage image.
Here are the details for all your Tsunami Rose needs!!!
Tsunami Rose Blog: http://tsunamirosedesigns.blogspot.com/
Tsunami Rose Zibbet shop: http://www.zibbet.com/tsunamirose
Tsunami Rose Etsy Shop: http://www.etsy.com/shop/TsunamiRose
Tsunami Rose Facebook Page: http://www.facebook.com/tsunamirosegraphicdesign
Tsunami Rose Facebook Group: http://www.facebook.com/groups/tsunamirosedesigns/

You still have time to join us at the Tsunami Rose blog for the Wednesday Challenge - #12 Colour Inspiration.
Hope you're having a wonderful weekend!
Mo xxx
Wednesday, 20 March 2013
WOYWW #198 & Birdhouse Shaped Cards
Well my little crafty corner looks pretty much the same as always - bit messier than usual as i didn't tidy away all my bits when i was finished last night - just went to bed! You can stop by and have a nosy at crafty tables across the world with Julie over at Stamping Ground!
Only noteworthy things on there are my birdhouse shaped cards - I made two yesterday afternoon while the babies were napping and a Christmassy one last night while catching up with The Walking Dead! Also, on the desk are two sheets of Tsunami Rose Designs Vintage Rouge in Black for my next project with them - you can buy your paper here. Have a wee look at yesterday's blog post for some exciting news about me and Tsunami Rose! I like to have things around me to inspire me and figured if I have the paper ready to go I'll come up with something interesting to use it for!
I was inspired by a recent Craftwork Cards Blog entry by Marie Chillmaid who had created a St Patrick's Day Card using the Craftwork Cards Birdhouse Shaped card blanks and lots of green and white card Candi! I have made a couple of birdhouse cards before now but made another three yesterday! And now my daughter is hovering over my shoulder asking if she can have a go at making one... I might relent and let you all see the outcome in a few days!
So here are close ups of the cards I made yesterday - This first one uses the Sweet Pea paper pad and flowers with a 'Special Day' sentiment. Lots of crushed candi in Sweet Pea and Vintage Dots (Honey) .
I've layered up flowers from the pad and added candi centres.
I then discovered some Craftwork Cards retro daisies in my embellishment box and realised i had candi to match!
The card blank was covered with some black/gold shimmery paper and i've used candi again in the bottom left corner to make another flower shape. A new black and silver sentiment in the centre finishes the card.
And finally here's the card from last night - I love making my little flowers while sitting watching the tv - I can keep my hands busy and spend time with hubby!
As much as this is traditional Christmas colours - red, green and gold - the 'With Love' sentiment doesn't necessarily tie it to Christmas.
Ok.... so for those of you who did have a look at yesterday's blog post... you will know that my daughter made a card using the Tsunami Rose Vintage Rounge in Black and Pink that I used on my card yesterday and a few of you said you'd like to see it... so here goes...
I had covered the base card with the Vintage Rouge paper and cut a doily and attached it at either side the rest of the work is Sariah's (age 7.5years).
She coloured the doilies, wrinkling the edges to distress them, then added lots of glitter glue in red and silver. She's also added silver 'present' peel offs and a black birthday peel off at a jaunty angle in the centre. She's finished the card with a red bow that she asked me to make for her and she attached a flower gem onto. And, of course, some pink card candi with silver glitter completes the card!
Mo xxx
Tuesday, 19 March 2013
A Very Exciting Announcement!
I am freezing!!! There a mountain of snow outside and it hasn't stopped in about 14hours! Its crazy snowy here! But I have some fabulous news to warm my soul!
I discovered Tsunami Rose Designs via Pinterest a few months ago - I found a pin board full of card sketches including some that i've used on the blog here before and a load from Tsunami Rose. I hopped over to follow them on Facebook and love looking at the myriad of inspiration on their blog. The designs are digital papers to be downloaded and printed to your heart's content! Journal kits, 6x6 and 12x12 papers, mixed printed ephemera, beautiful stunning designs - they are mixed with your stash... ribbons, buttons, pearls, glitters, lace to make vintage inspired cards, layouts and altered art - totally yummy designs!
So imagine my excitement when Tsunami Rose Designs put out a Design Team call on their Facebook page! I sent them a message and heard back from the lovely Daisy Collins - designer extraordinaire! I've been accepted! So watch this space in the next few weeks for Tsunami Rose DT duties!
Today though, I have a beautiful paper to show you all - Vintage Rouge in black and Pink - available for download from Tsunami Rose Designs here.
I really wanted my first effort to be fab and i'm not entirely sure this is! I started a couple of projects with this paper and my 7year old daughter has actually made a better card than mine i think! Maybe if i'm brave enough I'll show you some of her work tomorrow!
This is a 6x6" square card blank tinted round the edges with Vintage Photo distress ink and stamped using Black Tuxedo Memento using stamps by Craftwork Cards. The tag started out life as lilac which i again tinted with vintage photo and some black round the edges. I cut the Vintage Rouge paper to match the tag, distressed the edges with a Tim Holtz paper distresser tool and more Vintage Photo. Curled edges add to the effect.
I added some lace ribbon and white opal Liquid Pearls and a segment of a paper doilie. I cut a few spirals of Vintage Rouge and some black paper so make into flowers and adhered - adding more liquid pearls in the patterned paper and Star Dust stickles in the black flowers.
Some black satin ribbon was added along with a few crystal accents and a distressed sentiment in the same colours. I then adhered the tag to the base card.
Another shot of the finished card from the side i an attempt to show the depth of the embellishments. I didn't put the tag on 3D foam as the flowers are quite deep already.
I really hope you like this, my first make for Tsunami Rose Designs! I very much look forward to joining the team and creating more inspiration for you with their fabulous designs.
Mo xxx
You can find Tsunami Rose Designs here and join in with their weekly challenge on a Wed!
Tsunami Rose Blog: http://tsunamirosedesigns.blogspot.com/
Tsunami Rose Zibbet shop: http://www.zibbet.com/tsunamirose
Tsunami Rose Etsy Shop: http://www.etsy.com/shop/TsunamiRose
Tsunami Rose Facebook Page: http://www.facebook.com/tsunamirosegraphicdesign
Tsunami Rose Facebook Group: http://www.facebook.com/groups/tsunamirosedesigns/
I discovered Tsunami Rose Designs via Pinterest a few months ago - I found a pin board full of card sketches including some that i've used on the blog here before and a load from Tsunami Rose. I hopped over to follow them on Facebook and love looking at the myriad of inspiration on their blog. The designs are digital papers to be downloaded and printed to your heart's content! Journal kits, 6x6 and 12x12 papers, mixed printed ephemera, beautiful stunning designs - they are mixed with your stash... ribbons, buttons, pearls, glitters, lace to make vintage inspired cards, layouts and altered art - totally yummy designs!
So imagine my excitement when Tsunami Rose Designs put out a Design Team call on their Facebook page! I sent them a message and heard back from the lovely Daisy Collins - designer extraordinaire! I've been accepted! So watch this space in the next few weeks for Tsunami Rose DT duties!
Today though, I have a beautiful paper to show you all - Vintage Rouge in black and Pink - available for download from Tsunami Rose Designs here.
I really wanted my first effort to be fab and i'm not entirely sure this is! I started a couple of projects with this paper and my 7year old daughter has actually made a better card than mine i think! Maybe if i'm brave enough I'll show you some of her work tomorrow!
This is a 6x6" square card blank tinted round the edges with Vintage Photo distress ink and stamped using Black Tuxedo Memento using stamps by Craftwork Cards. The tag started out life as lilac which i again tinted with vintage photo and some black round the edges. I cut the Vintage Rouge paper to match the tag, distressed the edges with a Tim Holtz paper distresser tool and more Vintage Photo. Curled edges add to the effect.
I added some lace ribbon and white opal Liquid Pearls and a segment of a paper doilie. I cut a few spirals of Vintage Rouge and some black paper so make into flowers and adhered - adding more liquid pearls in the patterned paper and Star Dust stickles in the black flowers.
Some black satin ribbon was added along with a few crystal accents and a distressed sentiment in the same colours. I then adhered the tag to the base card.
Another shot of the finished card from the side i an attempt to show the depth of the embellishments. I didn't put the tag on 3D foam as the flowers are quite deep already.
I really hope you like this, my first make for Tsunami Rose Designs! I very much look forward to joining the team and creating more inspiration for you with their fabulous designs.
Mo xxx
You can find Tsunami Rose Designs here and join in with their weekly challenge on a Wed!
Tsunami Rose Blog: http://tsunamirosedesigns.blogspot.com/
Tsunami Rose Zibbet shop: http://www.zibbet.com/tsunamirose
Tsunami Rose Etsy Shop: http://www.etsy.com/shop/TsunamiRose
Tsunami Rose Facebook Page: http://www.facebook.com/tsunamirosegraphicdesign
Tsunami Rose Facebook Group: http://www.facebook.com/groups/tsunamirosedesigns/
Subscribe to:
Posts (Atom)