JellyPages.com

Followers

Showing posts with label ribbons. Show all posts

Wednesday, 26 June 2013

Tsunami Rose Designs Challenge #26 Colour Inspiration

Morning folks! Here is my DT project for this week's Tsunami Rose Designs Blog Challenge. This week is a Colour Inspiration challenge using the Polished Lackluster Printable Journal kit. I have created a card.

I've added flowers, lace, ribbons and bling to the paper and ephemera and a couple of small sentiments from Craftwork Cards.

No glitter today but I think there's plenty going on without it!
Hope you like - here are all your links for Tsunami Rose, come and join our Challenge!
Mo xxx

Thank you guys so, so much for checking out our 26th Tsunami Rose Wednesday Challenge!


From now on every Wednesday you can join us for a new challenge that will include, altered art, cards, sketches, color inspirations. So whatever your style is, join us here and you can enter to win some awesome prizes!! And remember that we welcome non-blog projects!!

You are welcome to enter any project that you create using the Color Sketch (colors of the Polished Lackluster Journal), you may use any brand products that you post to your blog (or upload to tinypic.com) within Wednesday June 25th thru Tuesday, July 2nd.

Make sure you take advantage of the great offer in the Tsunami Rose Store.
With every $5 purchase, you will receive the FREE June Tag set.


 Tsunami Rose Designs Links 

TRD Sponsor DK Crafts Shop
600 Blog Follower Giveaway

Friday, 14 June 2013

Happy Birthday Carly!

I took a stall at my kids primary school Christmas Fayre last December and a young girl, upon seeing my Gorjuss Girls Christmas cards showed such excitement that I gave one for however many pennies she had left in her pocket - not many!
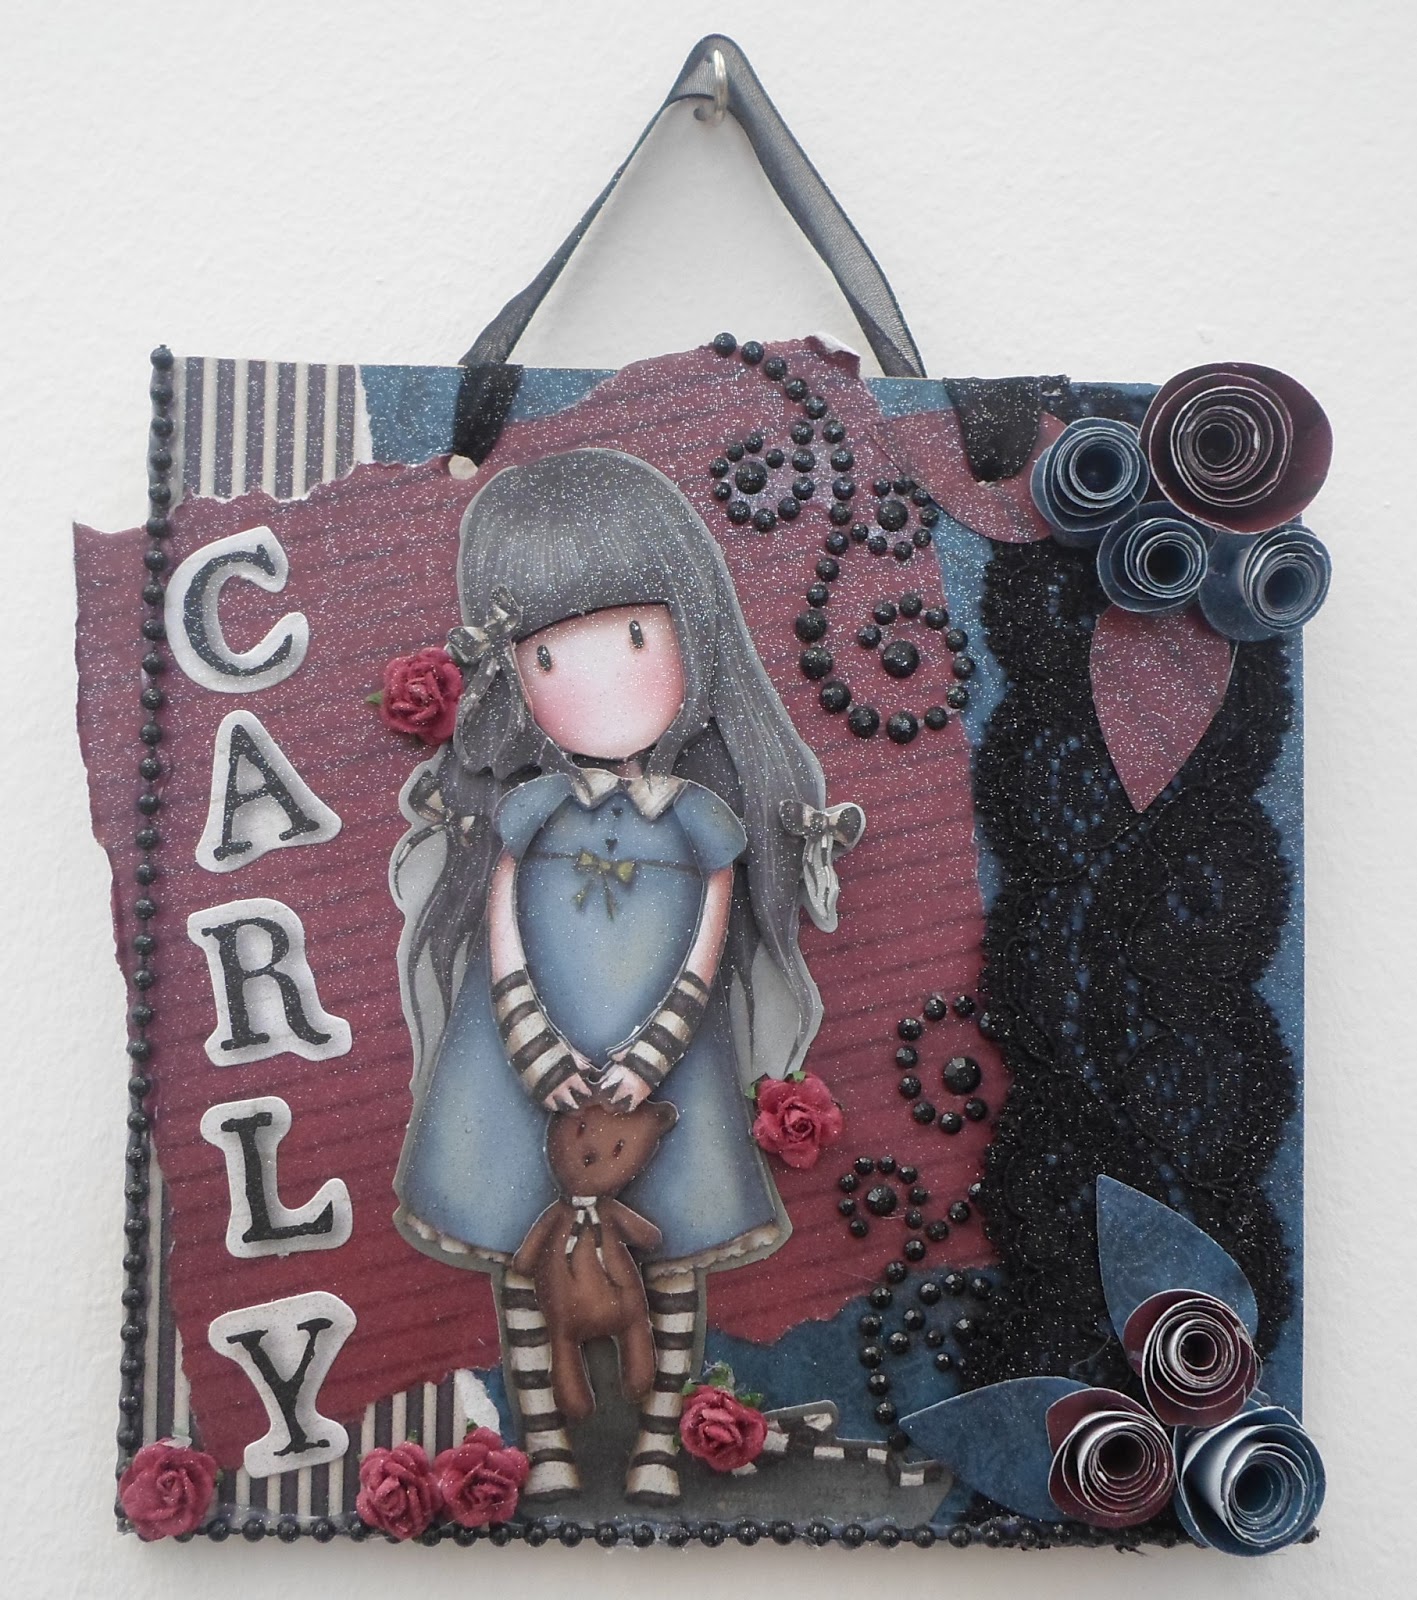
So, roll on last week. My son comes home from school with a birthday invite for this very same girl! I knew right away that I would have to do something Gorjuss for her and so here it is. If you've been here recently you'll already know that not only do I love my Gorjuss, I am also loving wall hangings just now so i've combined the two for Carly.


This is her card. For all the items I've used the DoCrafts Gorjuss range of papers, die cuts, ribbons and washi tape. Here I've just done some simple matting and layering, using two images, and have added black lace, mulberry paper roses and rolled black roses. 


I added some washi tape to the inside of the card and to the envelope as well.
 

My wall hanging is 6x6" and uses the same papers, rolled roses, lace and i've added beading and bling. I used the Gorjuss stickers to spell out Carly and have sprayed the whole thing with Silver Spray and Sparkle.


And finally, I made a tag to match for the gift bag.


I hope Carly has a lovely party tonight and can find room on her almost teenage girl bedroom wall to display her wall hanging.

Mo xxx

Saturday, 25 May 2013

Down the Memory Lane 1 Year Anniversary Celebrations!

Exciting blog post today! My Tsunami Rose Design Team mate, Nupur Patel is celebrating the first anniversary of her own blog - Down the Memory Lane!!! She has a whole fortnight of celebratory posts and has asked crafters from across the world to create something to help her celebrate - and I am honoured to say that she asked me to contribute!

I decided that it had to be something special - more than just a card - and when I opened a drawer I found a chipboard plaque! I decided on a wall hanging and then decided on a Gorjuss theme! The plaque is approx 12"x6" and has black organza tied on for hanging. There's a tag on there so I can personalise this later - possibly for my daughter once we get her room organised!


I have used the DoCrafts Gorjuss Ultimate Die-Cut pack and 12x12 papers pack. I used black acrylic paint to cover the edges and Mod Podged some papers on the plaque. I've used the die cut decoupage of the girl known as 'I found my family in a book' - one of my favourite Gorjuss Girls! Some other tags, frames and images from the die cut pack are also included on there.


I've used some ZVA creations adhesive bling and purple mulberry paper flowers. The Marianne Creatables Chinese Rose die allowed me to make rolled roses from a printed vintage french book page which was then sprayed with Tattered Angels Glimmer Mists in Fully Purple and Black Cherry.


The whole thing was then coated in Silver Spray and Sparkle to finish.


Many many congratulations to Napur and her blog! Why not pop over and have a go at winning some amazing blog candy while browsing the other featured artists!

Mo xxx

Wednesday, 1 May 2013

Tsunami Rose Challenge 18 - Mother's Day Challenge


Well, I am reliably informed that it is Mother's Day in the USA on May 8th and as I'm part of the Design Team for Tsunami Rose Designs, based in Las Vegas, this week's DT project is for Mother's Day!

This month we are working with printable ephemera from Tsunami Rose which you can buy as a file and print as required, these are available here.

When Daisy sent me the file for this week's challenge... I was totally inspired and went a bit crazy and made TWO projects for this week!


My first card was a vintage inspired card using the central image and wording from Tsunami Rose. I used some background papers from the Shabby Vintage Goodybag over at Craftwork Cards and some ribbon and 3mm string beads.


The large flower here is made using the Tim Holtz Tattered Floral die from Sizzix Alterations, and the spiral cut roses are using the Chinese Rose by Marianne Creatables. The paper used for both was from a 6x6" paper pad called Floral Fantasy by Louise Tiler - a recent free gift from Cardmaking & Papercraft magazine.


I used Worn Lipstick and Vintage Photo Distress Ink Pads also from Tim Holtz to distress/colour the flowers and the central image where i've also added someRanger Glossy Accents to the lady and the flowers. Opal White Liquid Pearls finish the edges of the card.

This next card is a far more modern take and very much my style - purple is my colour and i love this card!
I have used a chipboard dress form from Craftwork Cards along with purple card Candi. The B&W damask paper is from Victoria Park 6x6 paper pack by LilyBee Design.


The tag and wording are both printable ephemera from Tsunami Rose and i've added black organza ribbon and purple mulberry flowers to finish the card.... along with star dust stickles and Dusty Concord distress ink!


I hope you enjoy these designs, why not join us at the Tsunami Rose Blog for this week's challenge - there's no need to use TRD products but we love to see what you do with them!

All the links you need are below, see you soon!
Mo xxx


 Tsunami Rose Designs Links 

Monday, 29 April 2013

My Cousin got married!

Well, what a beautiful day on Saturday! My wee cousin married his bride in Ayrshire in the sunshine - in poured rain Friday and Sunday so they were lucky! I made them a large 8x8 card using some of my favourite Craftwork Cards products and also made them a flower wreath for their home. My sister asked me to make a card that she could give them too as she had worked the 15 days straight before the wedding and hadn't had time to get to a shop!

So here goes, lots of photos today and not many words!


This is the card from me and my family, i've used the typewriter font stamps from Craftwork Cards with a Tuxedo Black Memento Ink Pad. Here's a close up of the blooms - I have made lots of paper flowers and you'll have seen some of my wreaths previously on the blog but I think this is my favourite colourway for the moment!


I used a die from Marianne Creatables called Chinese Rose which cuts spirals to allow me to make more of the twisted centres - i've used the chevron paper with the die for these.


This is the wreath that I then made -I considered giving the card a detachable wreath but I know that I have kept all my wedding cards and I thought it would be nice for them to have the card and a wreath seperate - Its actually my 13th Wedding Anniversary today and my wedding cards are tucked away in a cardboard box.... that might be a project - making a keepsake storage box for the wedding cards, new baby cards etc.... That's going on my 'to do' list!


A couple of close ups of the wreath blooms!


I unfortunately didn't have a box.... but being the crafty person I am.... I made one! I used the scoring blade for my Cricut Paper Trimmer and made a box 6"x6" with matching lid from pearlescent card.


I've decorated the lid with some of the small flowers left over from the card and wreath.


Luckily there were several other larger flowers left over from the card and wreath so these were made into a card for my sister to give.


I've used ice white card candi and the candi alphabet stamps from Craftwork Cards here for the names.
A simple 'On Your Wedding Day' stamp competes both cards on the inside.

Oh and since nothing is complete without glitter - both cards and the wreath were all sprayed liberally with Gold Spray and Sparkle!

Hope you like them! Thanks for looking!
I'll be back on Wednesday with my newest project for the Tsunami Rose Design Team!

Mo xxx


Wednesday, 10 April 2013

Tsunami Rose Designs Challenge #15 - Sketch Challenge


I have been so ill! I honestly cant remember the last time I felt this bad but the show must go on and here is my second DT Project for Tsunami Rose Designs! This week's challenge is a Sketch Challenge based on this sketch and using the Tsunami Rose 'Ephemeral Love Affair' paper pack available here.


I managed to finally get hold of a set of Tim Holtz Tattered Florals Sizzix Alterations dies and decided to try them out for this challenge using them on the beautiful pink distressed damask paper from this pack. I cut some hessian/burlap too and layered up the flower with a gem in the centre and a scalloped circle underneath.


It might be hard to believe, but in all my stash, I could not find a single butterfly!!! So, a smaller tattered flower was adhered at the bottom of the card too instead. I have stamped a sentiment directly onto the paper.


And to finish, some antique distressed seam binding ribbon in a double bow at the top. I ran some vintage photo distress ink round the edges of the flower layers just to give some added dimension as well. 


Well, here's hoping I will be back to normal soon, I have so much to do including wedding invitations for my friend's impending nuptials - I really ought to get them done or that might be a very quiet day!

Why not join us for this week's Wednesday Challenge - there's no need to use Tsunami Rose Designs but we love to see what you do with them!

Mo xxx


 Tsunami Rose Designs Links 

Friday, 5 April 2013

With Sympathy

Just a quick blog entry for me today, dealing with 4 kids and the Easter Holiday is playing havok with my crafty time! The sun is shining... bit chilly but there's a load of laundry on the line, the beds are stripped and I've got a chocka to do list for today! First on the list... my entry for this week's Tsunami Rose Designs Wednesday Challenge!

This week it is 'Anything Goes' and you do not have to use Tsunami Rose products!
As a member of the design team, this week we are working with the gorgeous 'Damask Madam' paper pack which you can buy here.

For my entry i've used two of the gorgeous papers - a harlequin print and a rose print. I've added some ivory lace ribbon, paper roses and a black organza double bow. I've also had my first try of adding beading to a project!!! I used my hot glue gun for this and will need more practice - its a bit wonky when you get close up, but on a mantlepeice it looks not half as bad!!!


I stamped the sentiment straight onto the paper and only chose this to help widen the scope of my stash - most of the time I use a Happy Birthday/Thinking of You generic type message, but I thought a Sympathy card would be good to have!

Here's all the info you need for Tsunami Rose and you still have some time to enter this week's challenge!

Tsunami Rose Blog: http://tsunamirosedesigns.blogspot.com/
Tsunami Rose Zibbet shop: http://www.zibbet.com/tsunamirose
Tsunami Rose Etsy Shop: http://www.etsy.com/shop/TsunamiRose
Tsunami Rose Facebook Page: http://www.facebook.com/tsunamirosegraphicdesign
Tsunami Rose Facebook Group: http://www.facebook.com/groups/tsunamirosedesigns/


Thanks for looking!
Mo xxx

Wednesday, 3 April 2013

Tsunami Rose Challenge 14: Anything Goes

YAY!!!! The day is finally here! My first DT project for Tsunami Rose Designs! I am a new member of the Design Team for April and have stepped out of my comfort zone and harnessed my inner Goth for this first challenge project!

The papers are a sumptious pack called 'Damask Madam' and they are stunning - blacks and pinks with harlequin, damask and rose prints, with distressing and musical notes and just beautiful images! I love these papers and you can buy your very own set here!

So, what did I do for my first assignment? Well, here's how it started - strips of the gorgeous papers, a ribbon rosette and a satin ribbon bow!


The strips were mod podged onto a chipboard door hanger shape and left to dry, cut out and the edges painted with black acrylic paint. I used my hot glue gun to adhere the ribbons and rosette and the paper strip under the hole.

I found a fabulous vintage button in my mother's old button box which I attached to the rosette and added a couple of feathers under there for more dimension.

The metal heart shape has been stuck on the front of my box of embellishments for months and I knew I had to use it - it has wire and little pearls wrapped around it. 


Some paper flowers and sticky sparkles finish off the hanger - as well as some Frosted Lace Stickles Glitter Glue around some of the painted edges.

I hope that you will come on over the Tsunami Rose Blog and have a go at entering this weeks Wednesday Challenge! The theme this week is anything goes and you DONT have to use the Tsunami Rose products in your project - although we do love to see what you can do with them!

Mo xxx

All the links that you need are here - 


April 3-April 9, 2013


 Tsunami Rose Designs Links 

Monday, 1 April 2013

Altered Journal for Tsunami Rose Designs

Hope you are all enjoying the post Easter bloating and feelings of over indulgence!

Today I have been working on an Altered Journal for this week's Wednesday Challenge over at the Tsunami Rose Designs Blog! I am on the Design Team for April and have my first DT project ready to go on Wednesday but I'll tease you a little with this which I'm entering into the current Challenge!

I have used the Tsunami Rose Designs Lifes Abloom Printable Journal Kit to alter these pages - there are papers, tags, postcards, pockets, and lots of other ephemera to cut out and play with! You can order these from the Tsunami Rose shop here.


 For the front i've used the XCut Petal Posy dies to cut flower shapes from one of the gorgeous papers in the kit, i've adhered these with a diamante in the centre. I added lace ribbon down the outer edge at the spine and cream lace on the inside of the front cover - peaking out the edge. Two tickets and some more sparkle finish the front.


The flower on this ticket was painted with Tim Holtz Crackle paint in Clear Rock Candy and some heirloom gold perfect pearls rubbed into the cracks for a distressed look. I also added gold embossing powder round the edges using a glue pen and heat gun. 


These show the first two pages inside the journal - its a work in progress so i'll try and show more in a few weeks when I find more time to work on this! I've used more of the papers tags from the kit as well as a pocket. Some Tim Holtz stamps in Black Tuxedo Memento were stamped directly onto the page - i think this might be too dark.... One of the tabs from the kit finish the page.


This is very much a learning curve for me.... the first time i've undertaken such a large and potentially detailed project. I need to expand my stash and work on gathering more bits and peices to add to the pages.
I think I shall be working on this for some time!

Here's all the info you need for Tsunami Rose and you still have some time to enter this week's challenge!

Tsunami Rose Blog: http://tsunamirosedesigns.blogspot.com/
Tsunami Rose Zibbet shop: http://www.zibbet.com/tsunamirose
Tsunami Rose Etsy Shop: http://www.etsy.com/shop/TsunamiRose
Tsunami Rose Facebook Page: http://www.facebook.com/tsunamirosegraphicdesign
Tsunami Rose Facebook Group: http://www.facebook.com/groups/tsunamirosedesigns/


Mo xxx

Tuesday, 19 March 2013

A Very Exciting Announcement!

I am freezing!!! There a mountain of snow outside and it hasn't stopped in about 14hours! Its crazy snowy here! But I have some fabulous news to warm my soul!

I discovered Tsunami Rose Designs via Pinterest a few months ago - I found a pin board full of card sketches including some that i've used on the blog here before and a load from Tsunami Rose. I hopped over to follow them on Facebook and love looking at the myriad of inspiration on their blog. The designs are digital papers to be downloaded and printed to your heart's content! Journal kits, 6x6 and 12x12 papers, mixed printed ephemera, beautiful stunning designs - they are mixed with your stash... ribbons, buttons, pearls, glitters, lace to make vintage inspired cards, layouts and altered art - totally yummy designs!

So imagine my excitement when Tsunami Rose Designs put out a Design Team call on their Facebook page! I sent them a message and heard back from the lovely Daisy Collins - designer extraordinaire! I've been accepted! So watch this space in the next few weeks for Tsunami Rose DT duties!

Today though, I have a beautiful paper to show you all - Vintage Rouge in black and Pink - available for download from Tsunami Rose Designs here.

I really wanted my first effort to be fab and i'm not entirely sure this is! I started a couple of projects with this paper and my 7year old daughter has actually made a better card than mine i think! Maybe if i'm brave enough I'll show you some of her work tomorrow!


This is a 6x6" square card blank tinted round the edges with Vintage Photo distress ink and stamped using Black Tuxedo Memento using stamps by Craftwork Cards. The tag started out life as lilac which i again tinted with vintage photo and some black round the edges. I cut the Vintage Rouge paper to match the tag, distressed the edges with a Tim Holtz paper distresser tool and more Vintage Photo. Curled edges add to the effect.


I added some lace ribbon and white opal Liquid Pearls and a segment of a paper doilie. I cut a few spirals of Vintage Rouge and some black paper so make into flowers and adhered - adding more liquid pearls in the patterned paper and Star Dust stickles in the black flowers.


Some black satin ribbon was added along with a few crystal accents and a distressed sentiment in the same colours. I then adhered the tag to the base card.


Another shot of the finished card from the side i an attempt to show the depth of the embellishments. I didn't put the tag on 3D foam as the flowers are quite deep already.

I really hope you like this, my first make for Tsunami Rose Designs! I very much look forward to joining the team and creating more inspiration for you with their fabulous designs.

Mo xxx

You can find Tsunami Rose Designs here and join in with their weekly challenge on a Wed!

Tsunami Rose Blog: http://tsunamirosedesigns.blogspot.com/
Tsunami Rose Zibbet shop: http://www.zibbet.com/tsunamirose
Tsunami Rose Etsy Shop: http://www.etsy.com/shop/TsunamiRose
Tsunami Rose Facebook Page: http://www.facebook.com/tsunamirosegraphicdesign
Tsunami Rose Facebook Group: http://www.facebook.com/groups/tsunamirosedesigns/

Monday, 18 March 2013

Gorjuss Altered Board Book

I have been exploring the phenoma of Altered Art this week and in my travels I came across this Altered Board Book by Lydia Levy a DT member over at Tsunami Rose Designs. She uses a child's board book - the thick pages and excellent binding make it very good for altering, it is thick and sturdy and you dont need to bind it yourself - check out her YouTube tutorial and see what you think!
She has used a gorgeous set of printable papers by Tsunami Rose called Life Abloom - a beautiful set!

As you may know, I have four children and we are surrounded at times with books - many of which have been chewed by one or more of said children - but I took myself off to the bedrooms in search of something to use! I found a small book, only 10 pages, inclusive of the covers, - the kind you get in a small 'library', maybe with 6 in a box.... this one used to be a tale of Piglet and Roo! It had been altered somewhat already - ie someone took a colouring pen to it!!! But no signs of chewed corners - all still smooth and straight so I took it to my desk and pulled out the Ultimate A4 Die-Cuts pack and my 6x6 papers - all from the new DoCrafts/Santoro Gorjuss range.


I covered each page with the papers and added some stripey Gorjuss paper to the spine, with a ribbon detail. The edges of the book were painted with black acrylic as were the fold lines between each page, some paint was added to a couple of the pages for detail too.


 I embellished the front with some crushed card Candi and some die cuts, and added 'with love' to a banner.


As I started to add ribbons and images to the pages, I was inspired to make this a creation to give to my neice. Her name is Sky and she's having a hard time right now - I added her name in Gorjuss sticker letters and made it say 'The SKY's the limit!'


I added polka dot ribbon pulls for opening the pages. And added some wording on a few tags inside. 


I found a few quotes that I think she will appreciate and hand wrote these on a couple of the pages - using the lines of the papers as a guide.


This is, in my mind, a very simple example of an altered book. The board style book leaves no room for 3D work inside - otherwise the book will not close. I thought about adding a pocket and tag but may put something like this on the back with a tag that pulls out - I will update this post if i do decide to add that.

I am happy with how this has turned out and I am very much looking forward to doing another altered book project - perhaps a notebook/journal, something with more scope for 3D work, pockets, embellishments throughout. Watch this space!

Mo xxx