Ok, so maybe Halloween isn't for you, well today we have a Birthday challenge at the Crafters Cafe Challenge Blog and this might be more your thing! We are sponsored by Eureka Stamps and I have been working with a pile of presents to show you today!
I have coloured the image with promarkers and added stickles in various matching colours and teamed the image with the new Craftwork Cards Vintage Boho paper and die cuts kit. I used a spellbinders die to cut a mat for the image and inked the edges with Peacock Feathers distress ink, mounted this onto a couple of doilies also with the DI on the edges.
I decided to make this an easel card just to be a bit different from my usual 6x6 sqaure! I covered the card base with papers from tehe Vintage Boho pad and layered up a sentiment to hold the easel in place.
I finished the card with more Peacock Feathers DI and Lagoon Stickles along with a couple of frilly flowers cut from strips of the paper.
Thanks for looking, hope you enjoyed the card and I hope to see you for some birthday celebrations at the Crafters Cafe!
Mo xxx
Wednesday, 30 October 2013
Black and Red theme at Crafting By Designs
Well, we have a new challenge for you today at Crafting by Designs and I am your host for this week's challenge! Why not pop over to the blog just now and see what the team have come up with to inspire you today with the images from our fabulous sponsor - Ike's Art!
The sentiment and a large black bow finish the card.
Thanks for looking, hopefully you'll join us this week with Ike for this challenge!
Mo xxx
I had the joy of working with an image called 'Honey' and I think when you see it you'll understand the 'Dont call me honey!' sentiment! The theme for this week is 'Red and Black' and I have used promarkers to colour her to the theme, lots of lovely blood red! The card base is an A4 damask card from Kanban folded to make the base and I've used lots of red card and black pearlescent paper for matting and layering. I also rediscovered a My Memory Keepers cutting tool with a deckle blade so I've used that for most of the cutting.
The sentiment and a large black bow finish the card.
Thanks for looking, hopefully you'll join us this week with Ike for this challenge!
Mo xxx
Monday, 28 October 2013
Simply Betty Stamps October Fanpage Challenge
Right in here at the tail end with this one! The challenge over at Simply Betty this month was to use either Fortune Teller Betty or Voodoo Corinne with a specific embellishment. I have Betty and she was to be blinged!
A quick tag with some lace, ribbons, and bling. Lots of different coloured stickle accents on the image which I have coloured with promarkers. Bo Bunny Fright Delight papers for the background.
Not my greatest work and the picture is rubbish as it's getting late and very dark here but hey ho, the challenge is nearly done and I needed to get this in!
Thanks for looking!
Mo x
Saturday, 26 October 2013
Altered Kids Board Book for Tsunami Rose Designs
Well folks, it's my turn to show you another project using the Tsunami Rose Designs 'Witches Brew' Printable Journal Kit. This is a Halloween themed kit with decorative papers, journalling pages and printable ephemera and sentiments. I absolutely love it and have decided to use it to alter a kids board book this week. I started with a small 3" sqaure book of nursery rhymes!
Each page was then covered with the papers - I have used Mod Podge to adhere the cheets to the book but I guess you could use your favourite adhesive or PVA glues. Once dry, I ran a craft knife around the edges to tidy them up and then sanded them down with sandpaper for a smooth finish and to get rid of raggedy rough edges.
I started fussy cutting a few of the images from the ephemera sheets, some sentiments and a a few of the tags ready to fit into the book. As its a board book there is not a lot of room for dimension, however, I've got a few bits of bling in there and the fact that the book does not close fully just gives a bit more character!
This is the cover and I have used hot glue to attach some ribbon to the outer edge at the front and back of the book. I used a vintage girl and pumpkin image with sentiment. I've also attached some head pins, roses and adhesive pearls to finish the front.
The first double page I have used some of the journalling pages with some 'Black Soot' distress ink around the edges. I added a sentiment to the left and used an image to make a pocket on the right side.
In the pocket is a double sided tag with sentiment and ribbon for pulling it out.
This is the next double page and you can see theback of the tag from the previous page. I used some Fired Brick distress ink on the edges here and some strips of orange diamantes along with some of the ephemera images from the kit. There is room here for a photo - my daughter is dressing up as a 'Zombie' Red Riding Hood this year and I figure that will go there!
The next double page is purely for adding some journalling. I have used the red journalling papers and added vinyl spiderweb stickers and strips of red diamantes here. More black and red distress ink around the edges here too.
The last double page I have adhered one of the larger images to some pearlescent orange paper and folded it down inside the page, the ribbon can be used to pull open the 'pop up' image. The right hand page uses one of the decorative papers with a 'happy halloween' vinyl sticker added.
Here is the pop up opened fully and the back of the tag from earlier.
This is the back of the book with a poison warning label and more of the lace.
Wow!! Very picture heavy but you had to see all the pages to get a look at all the fabulous bits from the kit!
I hope that you have liked seeing this project, I loved making it and am off to look around the charity stores for more of the mini books to alter!
Thanks for looking!
Mo xxx
 |
| (Click Image to See Journal in Zibbet Shop) (To see in Etsy Shop click here) |
Tsunami Rose Designs Links
Friday, 25 October 2013
Creepy Halloween at Left of Centre Challenge Blog
Ooooh! It's almost Halloween, not long to go, I hope you have your costumes ready! Today we have a 'creepy halloween' challenge beginning at Left of Centre Challenge Blog and we are delighted to be sponsored by Rick St Dennis and his fabulous array of images.
I have chosen his rendition of the Silent Hill Nurse and kept my card pretty simple. Some designer papers from My Mind's Eye and Vintage Photo distress ink along with a seam binding bow and metal embellishment are all I've added. I reckon the image is pretty freaky without adding extra to the card.
I hope you will join us this week for a creepy halloween, enjoy the night when it comes!
Thanks for looking!
Mo xxx
Wednesday, 23 October 2013
Orange and Purple colour challenge at Crafting by Designs
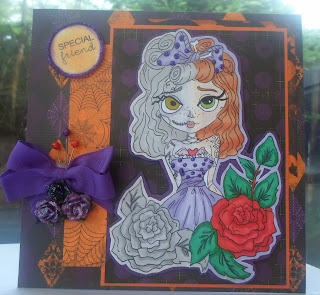
That's us getting into the last week of October and the end of the Halloween projects, how sad! And today we have a fabulous colour challenge at Crafting by Designs - Orange and Purple. We also have a fabulous sponsor in the shape of Lacy Sunshine and I have been working with the gorgeous Myra Mains image.
She is a half dead girl with roses and I have coloured her with promarkers to show this - human skin colours on the right and very grey, undead looking on the left! The roses echo this comparison too. I have used Bo Bunny Fright Delight papers for the card. Also, orange and purple pearlescent papers for layering.
To finish I coloured a sentiment from Craftwork Cards to match the colour scheme and added pins, flowers and a bow... with a touch of stickles dotted about too!
Thanks for looking, I hope you will join us for this challenge!
Mo xxx
Monday, 21 October 2013
Week 3 of Halloween at Dilly Beans!
A quick postie from me tonight, I did have a huge post earlier, but it was almost two weeks too early!!! So you'll be seeing that again on the 1st of November! Here I have an ATC. I have used a Dilly Beans image of Alice of 'wonderland' fame and decided to get her goth on for this week's Wicked Wednesday Challenge - 'get goth'!
I used paper from the Bo Bunny Fright Delight paper pad, a Crafty Stamps wed stamp and a little spider charm. The words are from my label maker thingy - I want to apologise for this!!! I have been looking online and facebook and at blogs as well as hopping with the Smeared and Smudged 31 Days of Halloween Blog Hop and there is so much inspiration and I know I have seen someone use the label thingy recently but cannot think who, where or when! So if this is you, let me know!! And thank you for reminding me I had one!
I will enter this ATC into the following challenges -
Wicked Wednesday ATC Challenge - Get Goth
Dilly Beans - Halloween
Pile It On - Halloween/Day of the Dead
Oldie But A Goodie Challenge: Spooky and Stash
Dream Valley Challenge: Halloween
2 Creative Chicks: Halloween
Crafty Sentiments: Halloween
Sparkle N Sprinkle: Anything Goes with Glitter, Embossing Powder and/or Flocking (Silver glitter EP on web)
Thanks for looking!
Mo xxx
Wednesday, 16 October 2013
Anything Goes at Crafting By Designs
This week is Anything Goes at Crafting by Designs and we have two fabulous sponsors - The Paper Shelter and Big Head Stamps.
I have used the Japanese Cute Doll along with some random Japanese papers I found in my stash - new my hoarding would come in useful! I added some lilac card Candi to the corners and a sentiment from Craftwork Cards. I finished off with a big purple bow and faux stitching.
I have coloured her with my faithful Promarkers in my favourite purple tones.
The image I used from Big Head Stamps is a wee boy called Luc. I figured he would make a very cute school boy and turned him into a card for a teacher. I used papers from Kaisercraft Technologique 6x6 pad and some free stamps from a recent stamping magazine.
Again the image was coloured with promarkers.
Thanks for looking! Hope you will join us for this week's challenge!
Mo xxx
New Challenge at The Crafters Cafe Challenge Blog
Time for a new challenge today over at the Crafters Cafe Challenge Blog and this week we are sponsored by QKR Stampede. The theme this week is 'How adorable' and I have used the fabulous 'Ragdoll' digi stamp in my design.
The image is coloured using promarkers and I have used papers from K&Co called Hopscotch. I fussy cut one of the frames off the red paper and mounted it with 3D foam so it sits out from the card. The sentiment is from Craftwork Cards and coloured with Wild Honey distress ink. The blue ribbon is from my stash.
I hope you will pop over and join us for the challenge this week, thanks for looking!
Mo xxx
Challenge #34 at Tsunami Rose Designs
It's time for a new challenge at Tsunami Rose Designs and this fortnight we have a Colour Challenge for you. Using reds, oranges, black - Halloweeny Colours! We are promoting the Witches' Brew Printable Journal Kit this month and the elements of my card are taken from that kit.
I have made a 5x7" card by covering it with one of the journal papers. I have used a spellbinders die to cut a Fleur de Lis square from another of the journal papers. The main focus of the card is one of the Journal title pictures with the witch and pumpkins on which I mounted on black pearlescent paper, raising it with 3D foam. I fussy cut some bats and a sentiment from the printable ephemera and made these dimensional too.
I added some black lace and a black bow along with some buttons and bling to finish the card. There is also some black soot distress ink around the edges of the card too.

Thanks for looking, I hope you will join us for the challenge - you do not have to use Tsunami Rose products and you could win a prize!
Mo xxx
 |
| (Click Image to See Journal in Zibbet Shop) (To see in Etsy Shop click here) |
Tsunami Rose Designs Links
Tuesday, 15 October 2013
Calista Witch by Rick St Dennis
Oh dear the time is flying by so fast, there are just not enough hours in the day!
I had a chance to sit and colour so the first thing on my agenda was the Airless Chambers October Freebie - Calista the Witch by Rick St Dennis. This is available in both his Etsy and Zibbet shops and dont forget to sign up to his mailing list for future freebies!
I have coloured her with Promarkers and used BoBunny background papers as well as some purple pearlescent paper for matting. I've added Orange Peel Stickles, black self adhesive pearls and some funky orange witch's hat ribbon. I printed the sentiment and coloured with Marigold and Black Soot distress inks.
I will enter my card into the following challenges -
Airless Chambers - October Freebie Challenge
Digi Galore Challenges - Halloween
ABC challenges - Halloween
Incy Wincy Designs - Halloween
Lexi's Creations - Halloween
Parade Your Crafts - Halloween
Stamp and Create - October Challenge Fall/Halloween
The Crazy Challenge - Halloween
The Paper Nest Dolls Challenge - Halloween
Thanks for looking!
Mo xxx
Saturday, 12 October 2013
Halloween Wall Hanging for Tsunami Rose designs
Hi folks, happy Saturday to you all! I cannot believe how fast time is flying, it's almost Halloween!!! Which leads me perfectly onto today's project for Tsunami Rose Designs. This month we are using the 'Witches Brew' printable journal kit which includes fabulous papers, ephemera and sentiments in fabulous oranges, blood reads and blacks for Halloween.
If you've followed my blog for a while you will no doubt know that I love to make a wall hanging now and then and I thought, for my first Tsunami Rose project in a while, I would do a Halloween themed hanging.
I started with a 6x6" shaped chipboard page. I used Cosmic Shimmer glue to cover the front with black pearlescent paper, and having fussy cut a journal page, I attached that too, allowing the skeleton to hang down at the bottom.
The next stage was to sort through the printable ephemera - I find this easier to do with them sitting in front of me so I simply printed one of each sheets to use as needed. I cut some pieces and mounted them on red and black pearlescent paper.
I found some black lacy ribbon and adhered this down the left side with hot glue and attached a large black satin bow to the top right with the same hot glue. I stitched a metal 'gravestone' charm onto the bow and added organze ribbon to the tag. Burgandy and black satin ribbon is used to hang the hanging.
'Spooktacular night' was shaped before adding to the hanging.
And for finishing touch, I fussy cut some fabulous black bats from another of the journal pages and attached them using 3d foam.
I hope you like the finished peice. I think I will put up some hooks in my front hallway and hang lots of Halloweeny makes in time for the trick-or-treaters!
Here is more information for all your Tsunami Rose needs, I hope you will join us on the blog for more inspiration!
Thanks for looking!
Mo xxx
Here are all the links for your Tsunami Rose needs -
 |
| (Click Image to See Journal in Zibbet Shop) (To see in Etsy Shop click here) |
Tsunami Rose Designs Links
Subscribe to:
Comments (Atom)


